Chapter 3: New Floor and Finished Solar Panels.

 Yesterday I came home from school suprised to see that my brother had already installed the hardwood floor! He has a second job in flooring and got this really nice stuff for free.

Yesterday I came home from school suprised to see that my brother had already installed the hardwood floor! He has a second job in flooring and got this really nice stuff for free.
 Opening boxes is always exciting.
 Here, I'm "dry fitting" the mounting brackets...
 ...and measuring to make sure everything will fit on the roof.
 Once the measurements were made and everything was how I wanted it, I marked where the mounting brackets needed to be attached to the panels.
 Then, I flipped the panels over and started wiring everything up. They needed to be wired before mounting because I wouldn't be able to reach under and wire it up once the panels were right side up.
 Panels wired together in parallel.


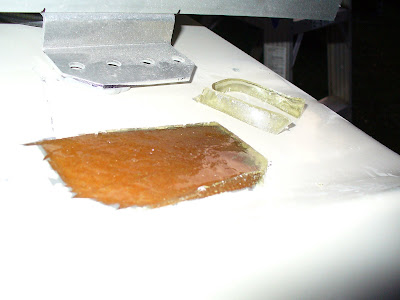
Then I measured, mixed, and poured fiberglass. Here is the first one I did. The fiberglass resin filled the mould, bonded to the roof and leveled the surface perfectly.
This was the only one I got done before it was too dark to do any more. So I went into the garage and started work on my kitchen.
Cutting wood the old fashioned way. 
Kitchen: I put the sink and stove top in just to show off how it will look. It's still far from done.


So that's all I got done last weekend. Today I finished bolting the panels to the roof, now I just have to wire them up to the charge controller and batteries. Thursday my brother is bringing over the hardwood flooring and is going to help me install it. I'm trying to get as much done as I can before it starts getting really cold outside. Once the floor is done I can start insulating the walls and getting the wiring in place and hook up all of the kitchen stuff. I'm estimating all of that will take about 2 more weeks.

 I took out all of the back seats in a day. They were bolted through the floor and then the foam and carpet were installed on top of that. So I had to tear out the carpet and foam before I could get to the bolts. You can also faintly see the rear AC unit in the back that I had disconnected. The two captains chairs were heavy! They weighed about 60lbs each. The back chair was no lightweight either. The whole van will probably the same after I'm done turning it into a home.
 View from the rear.
 Clean. All of the floor, walls and ceiling have been stripped. That ugly yellow stuff is adhesive that they used to glue the carpet to the wheel wells. I couldn't scrape it off without also removing the paint. You can also see three large holes in the floor from the previous conversion. I took out all of the upholstered stuff because it was filled with cheap nasty rotting foam.
 The screws that hold the top to the body were rusting so I sealed them. It's not pretty but it serves a purpose and I'll make it prettier later.
I covered and sealed the large holes in the floor with aluminum flashing. Then I cut some of the better 1/4 inch plywood that I salvaged into rough strips to even out the ridges in the floor so that I would have a level surface to put the sub floor on. And then I glued it down. Say hello to my little friend... That is one hell of a caulking device.
  I was working well into the night with a halogen work light. Here is a picture of the various levels of my sub floor. On the bottom is the van body w/plywood strips, then there is 1/2 inch of insulating foam and then there is 1/4 inch of plywood. The foam helps insulate the van and also dampens the vibrations when walking around inside.
 My finished sub-floor!
 That's all for now. What's coming next? Well, on top of this beutifuly built sub-floor I'm going to install the hardwood flooring that my brother was kind enough to acquire for me. Then I'm going to build my kitchen counter and cabinets and install my solar panels. I'll probably devote an entire entry about solar panel workings and how to install and wire them correctly. It's going to be interesting stuff!
