So here it is almost 2 years later and I have yet to leave.
A lot has changed for me. I've gone through a lot of personal stuff that I'll spare you from reading. I also just had surgery to fix a shoulder injury that was keeping me from climbing and thus keeping me from driving off to be a van-dwelling climbing bum. Having to pay for the surgery has hampered my enthusiasm and also completely taken the van budget to $0.
I'm recovering well and should be good to go by summer. One problem. My van now needs some surgery of its own.
The van is not running. During the summer of 09 I left for three months to work at a summer camp and let it sit. When I returned it was not happy. Now it has been sitting for almost a year and I'm just now getting my shit together enough to start thinking about what I should do with it.
Whatever happens, I'm ready to go for it and truly let go of a lot of the unnecessary comforts and luxuries that I was previously planning on taking with me in the van. Even if the van runs, I'll be making the conversion much more humble and simple than previously planned.
I've already invested a considerable amount of time and energy into it yet many aspects of my original plan have changed. I'm not sure what is wrong with the van so I'm not sure if it will be salvageable. I sure hope it is. At the same time I realize I could live with much less, like a pickup truck or small SUV/wagon with minimal modification. Though I really really really don't want to go through the hassle of finding another vehicle and trying to sell the shell of my previous attempt.
It could be a simple fix. It could also have already been kissed by death. Each day it sits and I'm frustrated knowing that things aren't getting better in there, yet I have no money to get it towed to a shop and no money to pay a mechanic once it gets there. Not yet anyway.
I'm very mechanically inclined and I'd love to get in there and fix it myself but I'm not sure where to start. If anyone out there reads this and knows their way around old fords, please help!
Here are the symptoms:
Before it completely died it would not idle smoothly.
When it started it would almost immediately stop running unless I gave it gas.
When I gave it gas, the throttle was very jumpy and the engine revved up and died down uncontrollably even when the gas pedal was held in a stationary position.
It would die as soon as the throttle was released.
Signs point to the TPS and vacuum sensors. I checked the vacuum sensors with a multimeter and they checked out fine. Not sure where to find the TPS, I'll have to check the repair manuals.
I know the old gas that has been sitting in the tank is probably another culprit but the van is parked 6 inches from my house on the tank side and I can't get to it. My brother suggested pouring something straight into the fuel injectors... I forgot what he said. I'll have to ask him again.
Sunday, December 12, 2010

Tuesday, April 7, 2009
Roof vent and First nights in the van.
I'm making slow progress again. A couple of weekends back I worked on the ceiling and roof vent and got it done in three days. It looks really nice and the roof vent will definitely move some air in the summer months to help keep it cool inside. The roof is fiberglass and on the inside I glued a layer of 1/2 inch insulating foam to it and then added a layer of reflectix insulation before attaching the 1/4 inch plywood panel. I finished the plywood with clear polyurethane and it looks very spiffy. After getting the ceiling put together I had to cut a giant hole in it to accommodate the roof vent. It was easier to put everything together first and then cut through it all in one pass. Cutting a 14 square inch hole in your roof is scary business. I considered paying an RV tech to do the install but I don't trust other people's craftsmanship. They aren't the ones who have to live with their work. I managed to do a good job and I was really impressed with myself at how clean it came out looking and I am 100% sure it will never leak for the rest of the van's life.
I still have to finish insulating the walls and then panel them. Putting up the paneling is going to be very hard. I have to figure out how to get all these square pegs into a round hole. The interior of the van is all curves but the wood is all straight. The 1/4 inch plywood will flex and take shape of the walls but all the shapes in the van are extremely difficult to measure. Not to mention my tools are limited and I have no workspace. Oh, and I have almost no idea what I'm doing. I just know what I want the finished product to look like. Someone asked me if I would build a bed in their van for them if they payed me for my work, I don't think I could do that in good conscious. I'm really just making it all up as I go along, I have no idea what I'm doing and anything good that comes from me is purely coincidental.
Building notes aside, I did spend my first few nights in the unfinished van last weekend while I was attending an AMGA course at the new river gorge in WV. This was also the longest trip I've yet to take in the van. For non-climbers [read: sane people] AMGA stands for American Mountain Guides Association. The weekend was nasty, cold and wet. I got to be outside for most of it. It was very nice to come back to the van and be dry and warm inside. I just slept on the floor with my sleeping bag, nothing fancy, it was nice though. A real bed will be necessary for full-time vandwelling.
I met Jim, the guide who was instructing the AMGA course, at the cathedral cafe at 8:30 Friday morning and we talked for about half an hour about sustainable bolting practices and preservation of natural resources while we waited for the other students to arrive. I originally planned on taking this course in NC but somehow ended up in WV and I'm glad I did because Jim was a great teacher and we shared a lot of the same values and opinions. The other students were much less experienced so most of the technical stuff we covered was rudimentary to me but I did learn a lot about guiding.
At the end of the second day Jim and I were talking as I shouldered my pack into the van. Jim asked in an upbeat voice if I was planning on living in it. I summed up all my plans into a single sentence which I blurted out excitedly,
"As soon as I graduate I'm going to Yosemite."
He said, "I went through three chevy astro vans and I lived in them for about 10 years. I got to climb everywhere."
"Really!?" I was psyched
"Yeah, as soon as fall came around we would drive out to Yosemite, then when it got cold we went to Joshua Tree. We just kept going south when it got colder and climbed year 'round."
Jim told me about his set up and how he had all his climbing gear in a cargo net above his bed and we talked for a little bit about what I planned to do with my van. We were both tired and hungry from the day though, so the conversation ended a bit prematurely. He did invite me to park at his farm for free whenever I'm back in WV though.
For that weekend I was staying at Rodger's Rocky Top Retreat, which is right on the side of the gorge and only $6 a night. Its basically a climbers only campground, a few mountain bikers stay there occasionally too and Rodger will turn away families who are looking for a wholesome family camping experience, with good reason. At night when there wasn't anything to do I'd go hang with him and the other climbers there that weekend. Rodger told me about all the different Vandwellers he's seen at his campground, there were lots! On a random note, inscribed on the Porta-Jon at the campground, was this awesome poem:
"O! My elegant modern age!
Silicon breasts and silicon chips
Are not more than a gilded cage."
-Unknown porta-jon poet
So all went well on Sunday, Jim said I was ready for the exam and I'm scheduled to go back up there on the 25th and 26th.
I still have to finish insulating the walls and then panel them. Putting up the paneling is going to be very hard. I have to figure out how to get all these square pegs into a round hole. The interior of the van is all curves but the wood is all straight. The 1/4 inch plywood will flex and take shape of the walls but all the shapes in the van are extremely difficult to measure. Not to mention my tools are limited and I have no workspace. Oh, and I have almost no idea what I'm doing. I just know what I want the finished product to look like. Someone asked me if I would build a bed in their van for them if they payed me for my work, I don't think I could do that in good conscious. I'm really just making it all up as I go along, I have no idea what I'm doing and anything good that comes from me is purely coincidental.
Building notes aside, I did spend my first few nights in the unfinished van last weekend while I was attending an AMGA course at the new river gorge in WV. This was also the longest trip I've yet to take in the van. For non-climbers [read: sane people] AMGA stands for American Mountain Guides Association. The weekend was nasty, cold and wet. I got to be outside for most of it. It was very nice to come back to the van and be dry and warm inside. I just slept on the floor with my sleeping bag, nothing fancy, it was nice though. A real bed will be necessary for full-time vandwelling.
I met Jim, the guide who was instructing the AMGA course, at the cathedral cafe at 8:30 Friday morning and we talked for about half an hour about sustainable bolting practices and preservation of natural resources while we waited for the other students to arrive. I originally planned on taking this course in NC but somehow ended up in WV and I'm glad I did because Jim was a great teacher and we shared a lot of the same values and opinions. The other students were much less experienced so most of the technical stuff we covered was rudimentary to me but I did learn a lot about guiding.
At the end of the second day Jim and I were talking as I shouldered my pack into the van. Jim asked in an upbeat voice if I was planning on living in it. I summed up all my plans into a single sentence which I blurted out excitedly,
"As soon as I graduate I'm going to Yosemite."
He said, "I went through three chevy astro vans and I lived in them for about 10 years. I got to climb everywhere."
"Really!?" I was psyched
"Yeah, as soon as fall came around we would drive out to Yosemite, then when it got cold we went to Joshua Tree. We just kept going south when it got colder and climbed year 'round."
Jim told me about his set up and how he had all his climbing gear in a cargo net above his bed and we talked for a little bit about what I planned to do with my van. We were both tired and hungry from the day though, so the conversation ended a bit prematurely. He did invite me to park at his farm for free whenever I'm back in WV though.
For that weekend I was staying at Rodger's Rocky Top Retreat, which is right on the side of the gorge and only $6 a night. Its basically a climbers only campground, a few mountain bikers stay there occasionally too and Rodger will turn away families who are looking for a wholesome family camping experience, with good reason. At night when there wasn't anything to do I'd go hang with him and the other climbers there that weekend. Rodger told me about all the different Vandwellers he's seen at his campground, there were lots! On a random note, inscribed on the Porta-Jon at the campground, was this awesome poem:
"O! My elegant modern age!
Silicon breasts and silicon chips
Are not more than a gilded cage."
-Unknown porta-jon poet
So all went well on Sunday, Jim said I was ready for the exam and I'm scheduled to go back up there on the 25th and 26th.
On the trip back from WV the weather got really bad- sleet, snow, and high winds. I was actually pretty comfortable driving in it. But then I ran out of gas. This was because my gas gauge has been broken for a while and something was wrong with my second gas tank which was full the whole time. I had gas in the second tank but it wasn't getting to the engine for some reason and of course, this was the first time I needed it. I was lucky to have rolled to a stop near an exit but I still had to walk a mile in the nasty weather to get to a gas station. When I arrived at the station they didn't have any suitable containers to carry gas with. So I bought two gallons of winshield wiper fluid, dumped them into the complimentary winshield wash stations outside and then rinsed them out with water. I filled them up with gas and proceeded to walk back to the van and I succsessfully hitched a ride for half a mile to where the exit intersected the road.
There was no spout on these containers. I ended up spilling about half of the gas on the ground as tractor trailers sped by missing me by what seemed like inches, while splattering me with icy road sludge. But the van started and got me to the gas station and on my way home again. I really need to get that gauge fixed and figure out what's up with the second tank.
Despite that incident, it was a good weekend. I was on my own and it was a welcome change, difficulties included.
Sunday, February 22, 2009
Spring is almost here!
Finally!
It has been a while since my last update. Winter blues set in when it got cold and I just lost my motivation for a while. I'm still alive and still planning on living in the van. Now that its warming up I'm starting to get off my ass and do things more often. I've got more free time this semester so I should be able to get it done before summertime if I play my cards right. I have all the materials I need, it is just a matter of getting it in there and doing a good job. I guess my biggest mental block is the fact that I'll have to do some actual planning. My organizational skills are... how should I put this, nonexistent.
Thanks for the kind messages.
It has been a while since my last update. Winter blues set in when it got cold and I just lost my motivation for a while. I'm still alive and still planning on living in the van. Now that its warming up I'm starting to get off my ass and do things more often. I've got more free time this semester so I should be able to get it done before summertime if I play my cards right. I have all the materials I need, it is just a matter of getting it in there and doing a good job. I guess my biggest mental block is the fact that I'll have to do some actual planning. My organizational skills are... how should I put this, nonexistent.
Thanks for the kind messages.
Saturday, November 22, 2008
Conversion Photo Journal 4
Chapter 4: Interior work, lighting design, and insulation.
November has been a slow month for the van. After the floor was installed I moved on to the walls which posed some new challenges. The walls need to be framed, insulated and paneled. However, there is not much to attach things to and very few even surfaces that I can use. Real houses are easier because everything is flat and box shaped. With the van I've got to figure out how to fit flat wood around all sorts of curved surfaces and how to insulate all kinds of small, strangely shaped crevases. The classic square peg in a round hole problem. The framing is important because I'll be anchoring stuff like my bed, heater, and kitchen counter to it. It needs to be solid and bombproof so that crap doesn't get pulled off the walls and get wrecked if I hit a speed bump.
My solution: procrastination. I'm not sure how to go about it and since it is going to be a foundation for everything else to come, I don't want to screw it up.
So instead of starting on the walls, I started on some of the smaller manageable projects that I could move into the van after I frame it and get the walls done.
I got these solid maple cabinet doors for like 3 dollars at the habitat for humanity restore! Solid maple! They were painted an ugly translucent white and had some scratches but I knew that if they were sanded and refinished they would be beautiful. So I did that.
 I couldn't sand off the paint that was inside of the route, so I looked around the garage for something to cover up that ugly pastel white.
 I found some glossy green spray paint that matched my countertop perfectly. So I taped off everything but the routed area and painted them.

 I put them infront of the counter to get an idea of what it would look like when finished. pretty.
 I made the moulding around the edges of the countertop with some old wood I found in the garage, and a makeshift [read: ghetto ass] router. Not perfect but it has a cool handcarved look.
 I've since added a light coat of stain to all of the bare wood and finished everything with two coats of polyurithane. It looks really pretty, I'll get some pictures when it is installed in the van.
Hightech vandwelling.
If you haven't experienced my nerdiness you are about to get a full dose. I love LEDs (light emitting diodes). They are more efficient than compact florescents and incandecent lights, and they never burn out (lifespan >50,000 hours). If you have money to invest, invest it in LEDs. High power LED technology is growing very fast and every time I get a new electronic parts catalog the LED section has new pages. Mark my words, in 20 years LED and solid state lighting technology will be the primary source of artificial lighting in homes. It is the future in sustainable lighting.
Even if you don't know what LEDs are, you've seen them everywhere. New traffic lights, toys, flashlights, car dashboards...the list could go on and on. Beyond those cheap little clear bulbs there is a new type of LED technology emerging capable of producing almost 100 lumens per watt. LEDs that can do this are called "high-flux" LEDs... and I'm putting these in my van.
The cool thing about LEDs is they produce almost no heat and because they are solid state they can be switched on and off repeatedly with no reduction in lifespan. However, since LEDs are either on or off, you can't dim them efficiently unless you get creative. So I decided to use the switching capabilities to my advantage. I added a simple PWM (pulse width modulation) circuit into the LED driver to pulse the LEDs off and on at about 300Hz. That is fairly slow in the electronics world but fast enough not to be detectable by the human eye. I can then modulate the wave to change the length of time that the LEDs are on or off. Here is the schematic I drew of my system.
 I took some pictures with an oscilloscope to help illustrate the PWM concept.
 The dots on the top are the "ON" time, while the line at the bottom is the "OFF" time. In this picture, the PWM is running a 5% duty cycle which means it is only ON 5% of the time.
 Here it is again, this time at about 20%.
 50%
 80%
 95%

So, I definitely took the not so simple approach with lighting but I'll save a lot of power to use for other things.
Lastly, I've started insulating what I can. Here I'm filling up the door cavity with the styrofoam board that my solar panels were packaged in. I just stacked it in there like bricks. I sort of felt like an Eskimo cutting and stacking blocks of white stuff to keep me warm.

Friday, October 24, 2008
Conversion Photo Journal 3
Chapter 3: New Floor and Finished Solar Panels.

 Yesterday I came home from school suprised to see that my brother had already installed the hardwood floor! He has a second job in flooring and got this really nice stuff for free.


Wednesday, October 22, 2008
The Conversion Photo Journal 2
Chapter 2: Solar Panel Mounting and the Kitchen
Here are the fruits of this past weekend's labors.
Here is my new power plant, still in the boxes. Two 120 watt solar panels fed into a blue sky MPPT charge controller then into two 130 amp-hour trojan deep cycle batteries.
 Opening boxes is always exciting.

Important information!!! When you get a solar panel you need to know its output in volts and amps, all of the maximum ratings, and just about everything else in order to safely use it and also to maximize system efficiency.
 Here, I'm "dry fitting" the mounting brackets...
 ...and measuring to make sure everything will fit on the roof.
 Once the measurements were made and everything was how I wanted it, I marked where the mounting brackets needed to be attached to the panels.
 Then, I flipped the panels over and started wiring everything up. They needed to be wired before mounting because I wouldn't be able to reach under and wire it up once the panels were right side up.

 Panels wired together in parallel.


I used tamper-resistant bolts that require a special star Allen wrench.

With the tamper resistant bolts, I used a few tamper resistant nuts. The top part breaks off once it is torqued enough and leaves an un-wrench-able smooth surface. This way no one can steal my panels!


Once all the mounting brackets were attached, I covered the panels in the foam they were packaged in and wrapped them up in bubble wrap just in case they were to slip while I was trying to get them up on the roof. Here I used a blanket to help me slide the panels up without scratching up my van.

On top! Unfortunately the mounting brackets scratched the roof up a lot. It's not that big of a deal though because no one can see the roof and it is made out of fiberglass so it won't rust.


I used putty to hold the panels in place while preparing the roof for mounting. The roof is curved and not level, but the panels are ridged and the mounts require a level surface. My solution: fiberglass roof extensions. I stripped the areas where the mounts would go and then made moulds and poured in more fiberglass resin to give a level surface.

Before I could pour the resin, I wanted to make sure that the van was level so that the new mounting surface would be even. First, I parked the van as level as I could get it.

Then I used a lot of heavy crap to get the van perfectly level.

Then I measured, mixed, and poured fiberglass. Here is the first one I did. The fiberglass resin filled the mould, bonded to the roof and leveled the surface perfectly.
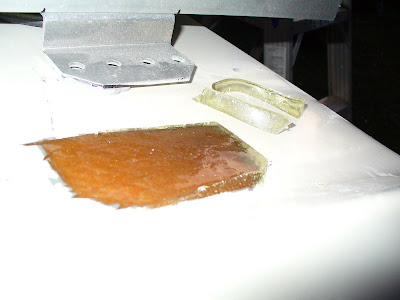
This was the only one I got done before it was too dark to do any more. So I went into the garage and started work on my kitchen.
Cutting wood the old fashioned way. 
Kitchen: I put the sink and stove top in just to show off how it will look. It's still far from done.


So that's all I got done last weekend. Today I finished bolting the panels to the roof, now I just have to wire them up to the charge controller and batteries. Thursday my brother is bringing over the hardwood flooring and is going to help me install it. I'm trying to get as much done as I can before it starts getting really cold outside. Once the floor is done I can start insulating the walls and getting the wiring in place and hook up all of the kitchen stuff. I'm estimating all of that will take about 2 more weeks.
Monday, October 20, 2008
An Overview of Solar Power
Solar Power
and why it's not the answer for everyone.
First, a word about solar panels:
Harnessing energy from the sun the way that plants do is great and there is definitely a lot of potential in the idea. However, photovoltaic "solar panels" aren't all they are cracked up to be. I don't believe that photovoltaics are the best answer for society's energy needs. I think that there are more useful and efficient ways to use the sun's power than PV but I won't go into that right now. Today I'm talking about PV. Today's photovoltaics are expensive and inefficient. Perhaps in the future the PV technology will be better, but available PV systems today have a few major downfalls that prevent them from being a commercial energy source. Those downfalls are efficiency and power storage. Photovoltaics can only create power when the sun shines and if that power isn't being used, its wasted. So that means batteries must be used to store the power until it is needed. But battery technology hasn't advanced much in the several hundred years since it has been in use in western society. Lead-acid batteries are still the norm and they are extremely temperamental and contain toxic materials. Grid-tie PV systems avoid batteries but at the expense of being attached to a pre-existing power "grid" or a utility which then must manage the power. So in short, the biggest problem is not about getting the power but managing it. Some form of storage has to be used in order for large-scale solar to be viable. The power has to get used, wasted, or stored in a battery.
How it works:
The Panels:
The sun emits light which is converted into electric current by the PV panels. There are several brands of solar panels and for the most part, all the big names put out the same kind of product with a few exceptions. Panel prices vary and fluctuate often, so be patient and wait for a good deal. I got two 120 watt panels for $475 each when they usually start at around $700. The current produced by PV's is not constant. PV's put out the most power during the peak hours of the day and less during the early and late hours. That power, before going into a battery, must be fed into a charge controller which regulates the current and the voltage in order to keep the battery at an optimum charge without over or under charging it. Without regulation, the battery will be undercharged and/or overcharged which will shorten its life and in some cases cause it to explode or emit large amounts of explosive hydrogen gas. So it MUST be regulated.
The charge controller:
There are a lot of very cheap "regulators" out there but they are all crap and some only regulate either voltage OR current, when you really need to regulate both. There are even some cheap "regulators" that don't regulate at all but instead only limit the power going in while wasting the rest! If you skimp on the regulator you are going to lose at least 20% of your solar capacity right there. That means if you have 100 watts going into a crappy regulator, you're going to see 80 watts output at best. So invest in either a PWM (pulse width modulated) or better yet, a MPPT (maximum power point tracker) charge controller and stick with the known brands (don't by junk from china). The good charge controllers start at $150 and go up from there.
Batteries:
From the charge controller the regulated power is fed into your deep-cycle batteries. Most batteries must also be maintained regularly. There are super expensive AGM batteries that don't require maintenance BUT they have less capacity and a shorter life span. So stick with the maintainable flooded cell lead-acid batteries unless you are such a slacker that you would rather pay three times as much for a battery that won't last as long. Rechargeable "deep-cycle" batteries can only be cycled a number of times before they can no longer hold a charge and they are very temperamental about the kind of charging they get. All the more reason to invest in a good charge controller! A well maintained and properly charged battery can last for more than 5 years but an abused or neglected battery can self destruct in a matter of minutes. Also, deep-cycle batteries are not meant to be discharged below 50% of their capacity. For instance, if you have a 100 amp-hour battery, think of it more like a 50 amp-hour battery in terms of use. So not only do you have to monitor the power going into the battery, you also have to keep track of the power you are taking out of the battery. A lot to keep up with huh?
The yield:
After all that planning, money, work, and math what do you get? Not a whole lot compared to being hooked up to the evil corporate "grid" unfortunately. For their size solar panels put out very little usable power. PV panels are rated at their maximum output, which means that they will only put out their rated number for a couple of hours while the sun is highest, then the power will taper off into oblivion as the sun sets. But wait there's more! PV systems produce direct current (DC) SO if you plan on using you 110 volt AC (alternating current) appliances, you're going to have to convert the power once again. If you know anything about real-world physics you know that in every conversion there is a loss of efficiency. That means that even more of our expensive power is going down the drain! Because there is not as much power and you can't completely drain your batteries- using solar requires you to scale back your energy consumption. The upside is that most panels have a warrantied output for at least 20 years. So you have a very high initial investment that pays off very slowly but really barely justifies all that trouble. Solar doesn't create any emissions, except for manufacturing and lets not forget about the toxic batteries. The one advantage that makes solar great is that it can be hooked up anywhere and it will provide silent power without needing to be plugged in to any grid and that is why I'm using solar panels on my van-house-mobile.
Conclusion:
Solar is not free or easy. Which is the real reason why it won't work in America. Let me be clear that I don't hate America, it is a beautiful country. It is such a shame that it belongs to so many lazy, over-entitled, complacent, and greedy Americans. Solar works for me though, it is perfect for being mobile. I'm sure photovoltaics will become more viable on a larger scale as the technology progresses but the technology just isn't there yet. If you don't need to be mobile and are looking for power alternatives, look at wind power. Wind turbines put out much more power than PV and cost less.
That's all for now, more pictures coming soon!
Saturday, October 11, 2008
Conversion Photo Journal 1
Chapter 1: The Demolition and Sub-Floor.
Here is what the interior of the van looked like when I got it. Pretty nice looking on the surface but not built very well as I discovered when tearing it all out.

 I took out all of the back seats in a day. They were bolted through the floor and then the foam and carpet were installed on top of that. So I had to tear out the carpet and foam before I could get to the bolts. You can also faintly see the rear AC unit in the back that I had disconnected. The two captains chairs were heavy! They weighed about 60lbs each. The back chair was no lightweight either. The whole van will probably the same after I'm done turning it into a home.
 View from the rear.
 Clean. All of the floor, walls and ceiling have been stripped. That ugly yellow stuff is adhesive that they used to glue the carpet to the wheel wells. I couldn't scrape it off without also removing the paint. You can also see three large holes in the floor from the previous conversion. I took out all of the upholstered stuff because it was filled with cheap nasty rotting foam.
 The screws that hold the top to the body were rusting so I sealed them. It's not pretty but it serves a purpose and I'll make it prettier later.

I covered and sealed the large holes in the floor with aluminum flashing. Then I cut some of the better 1/4 inch plywood that I salvaged into rough strips to even out the ridges in the floor so that I would have a level surface to put the sub floor on. And then I glued it down. Say hello to my little friend... That is one hell of a caulking device.
 I was working well into the night with a halogen work light. Here is a picture of the various levels of my sub floor. On the bottom is the van body w/plywood strips, then there is 1/2 inch of insulating foam and then there is 1/4 inch of plywood. The foam helps insulate the van and also dampens the vibrations when walking around inside.

 My finished sub-floor!
 That's all for now. What's coming next? Well, on top of this beutifuly built sub-floor I'm going to install the hardwood flooring that my brother was kind enough to acquire for me. Then I'm going to build my kitchen counter and cabinets and install my solar panels. I'll probably devote an entire entry about solar panel workings and how to install and wire them correctly. It's going to be interesting stuff!
Subscribe to:
Posts (Atom)


